
Operating Instructions
Your Imprintor Pad Printing Machine has been shipped to you fully assembled and ready to start. We have placed one finished pen on your product holder to provide you
a finished sample. All you need to do is add the ink. The
instructions below will guide you through the process from beginning to end.
Adding the Ink to the Ink Cup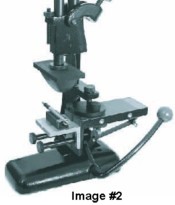
Cleaning and/or changing the Printing Plate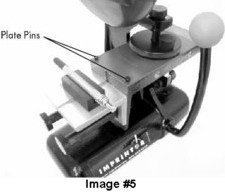
If you have any questions, feel free to contact us.
Adding the Ink to the Ink Cup
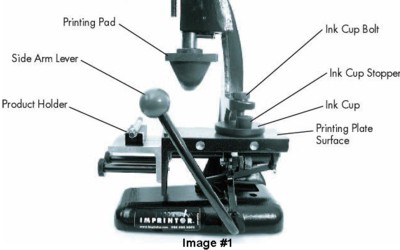
- Make sure that the Ink Cup Bolt is screwed down tight enough to hold the Ink Cup firmly to the Printing Plate surface. See image #1.
- Remove the Ink Cup Stopper from the Ink Cup.
- Add 100 drops of Thinner to your bottle marked Black Ink. Shake well.
- Pour all of your ink carefully into the Ink Cup and replace the Ink Cup Stopper.
- Place the pen onto the pre-mounted Pen Product Holder. Pen point should be facing to the left and the pen clip faces downward. Make sure you slide the pen so the clip catches on the stop in the middle of the Pen Product Holder.
- Pull the Side Arm Lever back and forth until the print image on the Printing Plate is covered with ink. This is referred to as inking the plate. See image #2.
- Pull the Side Arm Lever all the way forward, which will leave the inked image on your Printing Plate directly under the Printing Pad.
- Pull down the Imprintor Handle to ink the image onto the Printing Pad. See Image #3. After you make full contact with the inked image, lift the handle to its upright position.
- Next, push back the Side Arm Lever so the pen positioned directly under the Printing Pad.
- Pull the Imprintor Handle all of the way down until it stops. This will transfer the inked image to your pen. See image #4.
- Lift the Imprintor Handle to its upright position and remove your imprinted product. Be careful not to touch the freshly imprinted area until it is dry. Imprint is generally dry to the touch within seconds. Congratulations! You now have "the power of custom imprinting, right in your hands."
- Repeat this process to imprint remaining product.
- NOTE: When printing, the ink dries very quickly on your plate and printing pad. You must ink your pad and print right away to avoid your ink drying, which will cause an incomplete imprint. If this happens, gently wipe the ink from the plate using a cotton pad with cleaning solution applied. Periodically, you may need to remove excess ink from the printing pad. Take a 6-inch piece of the clear Imprintor tape and gently place the adhesive side of the tape to the bottom of the pad. Repeat this until the ink has been removed from the pad.
Cleaning and/or changing the Printing Plate
- To change the Printing Plate, place newspapers or other protective covering on a flat surface.
- Pull the Side Arm Lever forward. Unscrew the Ink Cup bolt from the Ink Cup.
- Remove the two pins holding the Printing Plate. See image #5. Lift the Printing Plate slowly off the printing surface while holding the Ink Cup in place on the Printing Plate. Be careful not to bend the Printing Plate. Doing so may damage the Printing Plate and prevent you from using it again.
- Turn Ink Cup over and wipe out remaining ink with a soft paper cloth.
- Thoroughly clean the Imprintor's parts, Printing Pads, and other surfaces on which ink has spilled or leaked with cotton pads and the cleaning solution. Repeat the same process on the Printing Plates, but be sure to gently clean the ink from the image surface, and be sure not to bend the plates. The Imprintor Machine is now ready for storage or you can move on to step 6 to continue use.
- Carefully reposition the new Printing Plate and the Ink Cup onto the printing surface.
- Ink the new Printing Plate and resume printing.